
Installing a Form
To install a form on your website, you first need to create it in ZoriCRM and then publish it through an embed.
In ZoriCRM, a form cannot be placed on a website by itself. Publishing always works through an embed. You can create that embed directly in the form creation wizard, so there is no need to create it separately in advance.
This article covers the main setup flow:
- create a form;
- configure its publishing settings through an embed;
- get the embed code;
- add it to your website;
- if needed, connect the form to your own button or another HTML element.
Before you start
Before installing a form, make sure you have:
- access to the Forms and Widgets section in ZoriCRM;
- the ability to add code to your website;
- a website where you want the form to work.
Step 1. Open the form creation wizard
Go to Settings → Forms and Widgets and click Create Callback Form or Create Request Form.
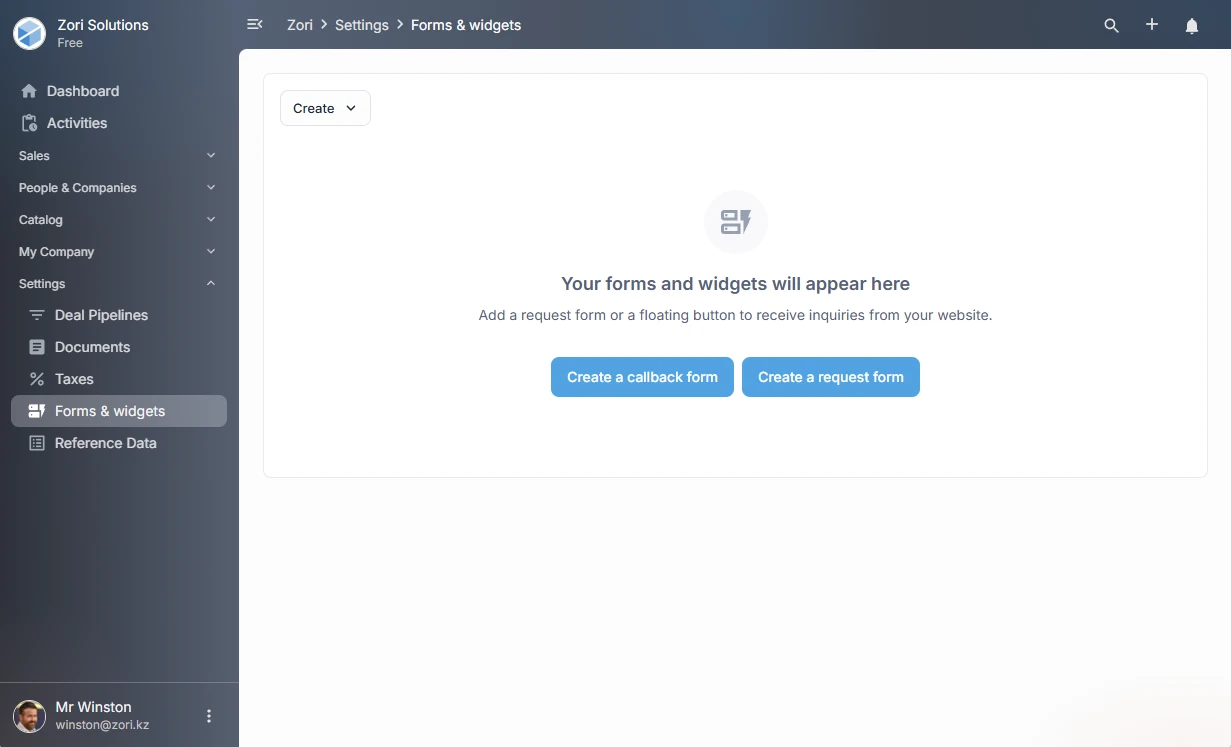
The form creation wizard will open.
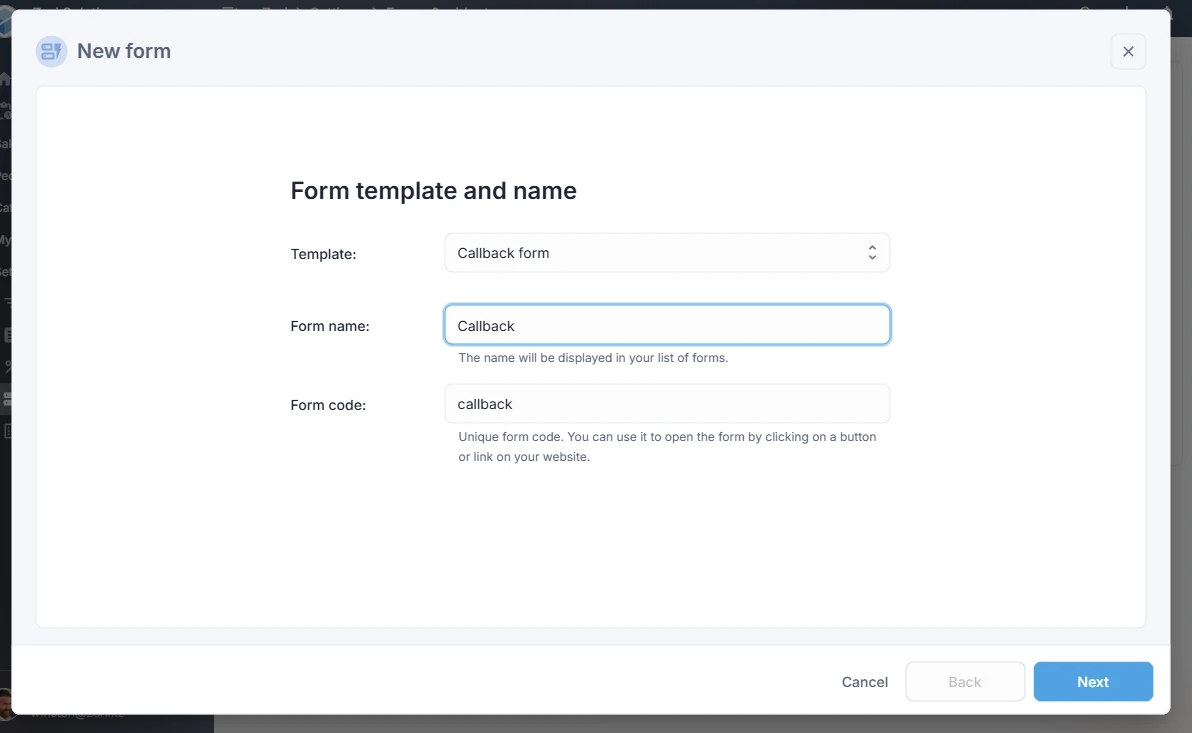
On the first step of the wizard, you need to specify:
- Template - the starting form template;
- Form name - the internal name used in your CRM;
- Form code - a code unique within your company.
The form code is used to open the form through JavaScript if you want to connect it to your own button or another element on the website.
The template is only a starting point. Later, you can change the fields, texts, and design of the form however you like.
Step 2. Configure the form
On the second step of the wizard, you configure the form itself.
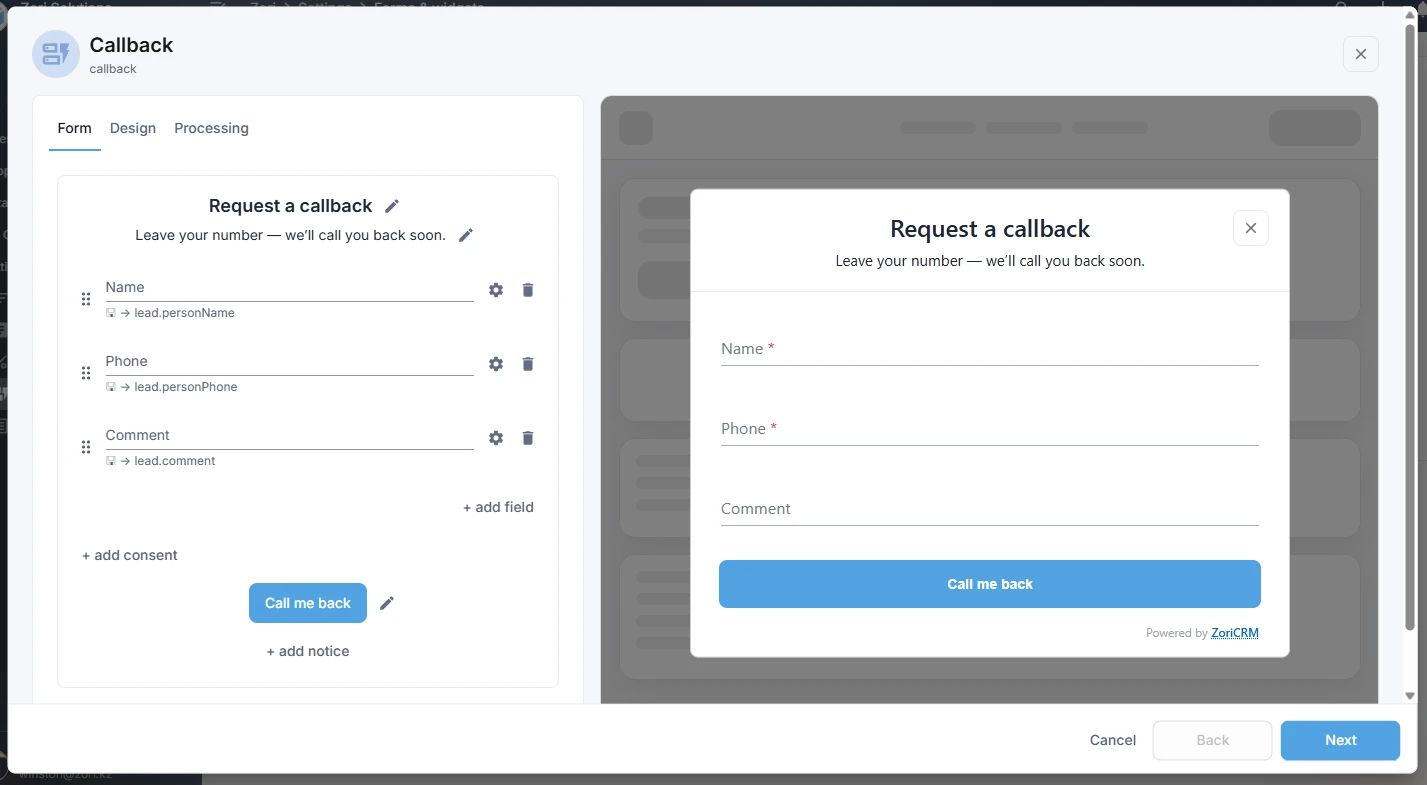
Here you can:
- change the title and subtitle;
- configure the fields;
- adjust the appearance;
- change the accent color;
- choose the field style;
- configure how the inquiry is processed;
- preview the form in real time.
At this step, you define what the visitor will see on the website and what data they will be able to submit.
Step 3. Enable publishing to your website
To install the form on your website right after creating it, turn on Embed on my website on the Publishing step.
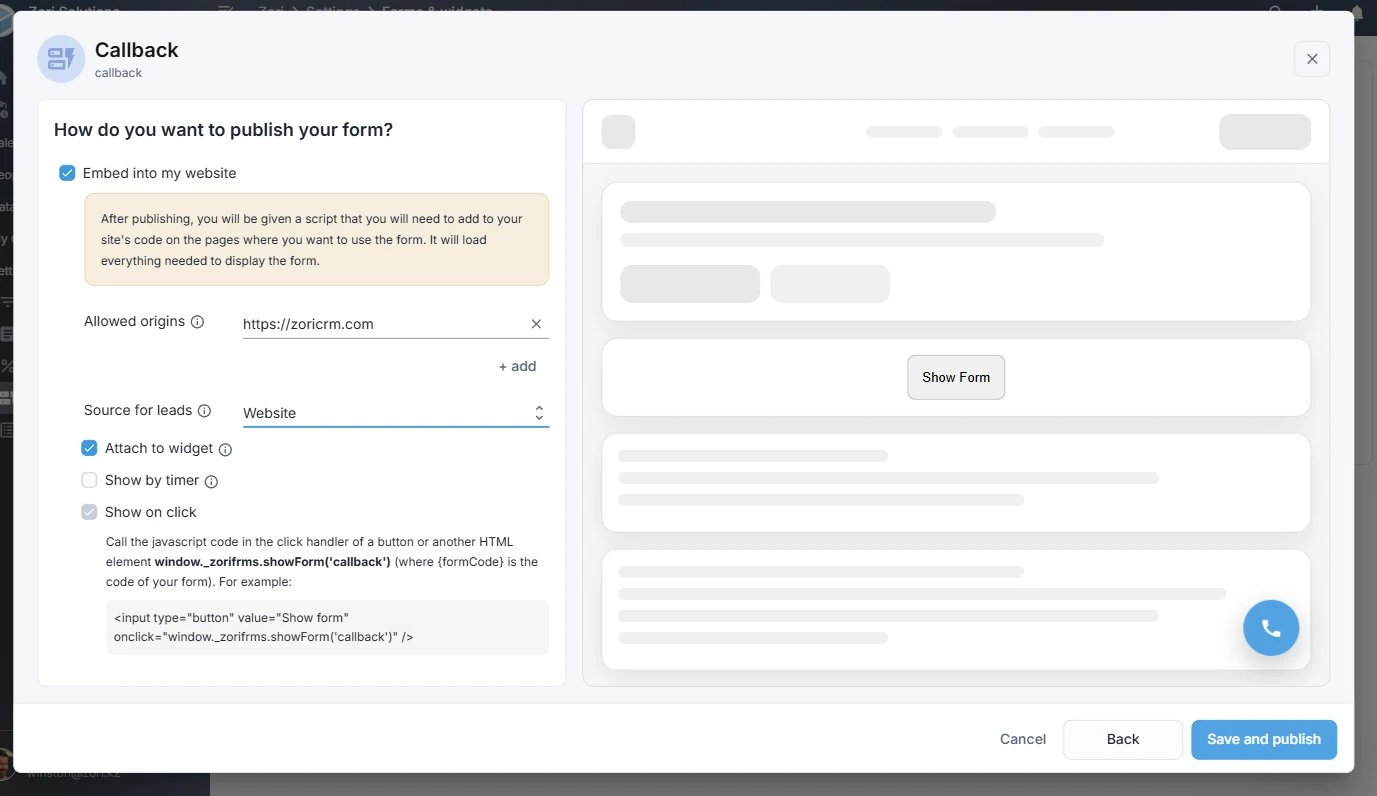
If this option is enabled, ZoriCRM will automatically create an embed together with the form. That embed is what publishes the form on your website.
At this step, you can configure the main publishing settings.
Allowed website addresses
Specify the website addresses where this embed is allowed to work.
You should include all root address variants that your visitors may use to open your website. For example, if your domain is zori.kz, and your website can also be opened at https://zoricrm.com and https://www.zoricrm.com, you should add both versions.
This is a required setting. If your website address is not included in the allowed list, the form will not work on that website.
Lead source
Specify the source that will be assigned to leads created from this form.
This helps you understand where inquiries came from later in the CRM.
Attach to widget
If you enable this option, the form will be available through the website widget.
Show by timer
If you enable this option, the form can open automatically after a specified number of seconds once the page has loaded.
In the same block, you can also configure:
- how many seconds to wait before showing the form;
- how often the form can be shown to the same visitor;
- the interval, if the frequency is set to once per period;
- whether the form should stop appearing after submission;
- on which pages the form should appear;
- included or excluded pages, depending on the selected mode.
Show on click
The form can also be opened by clicking your own website element, such as a Contact Us button.
This option is always available. In the wizard, you will see a hint with the JavaScript call that opens the form using its unique code.
If you do not want to publish the form yet, click Save without publishing. In that case, only the form will be created, without an embed.
Step 4. Get the code for your website
If Embed on my website was enabled on the previous step, the wizard will then show the installation instructions.
At this step, ZoriCRM displays the code you need to add to your website.
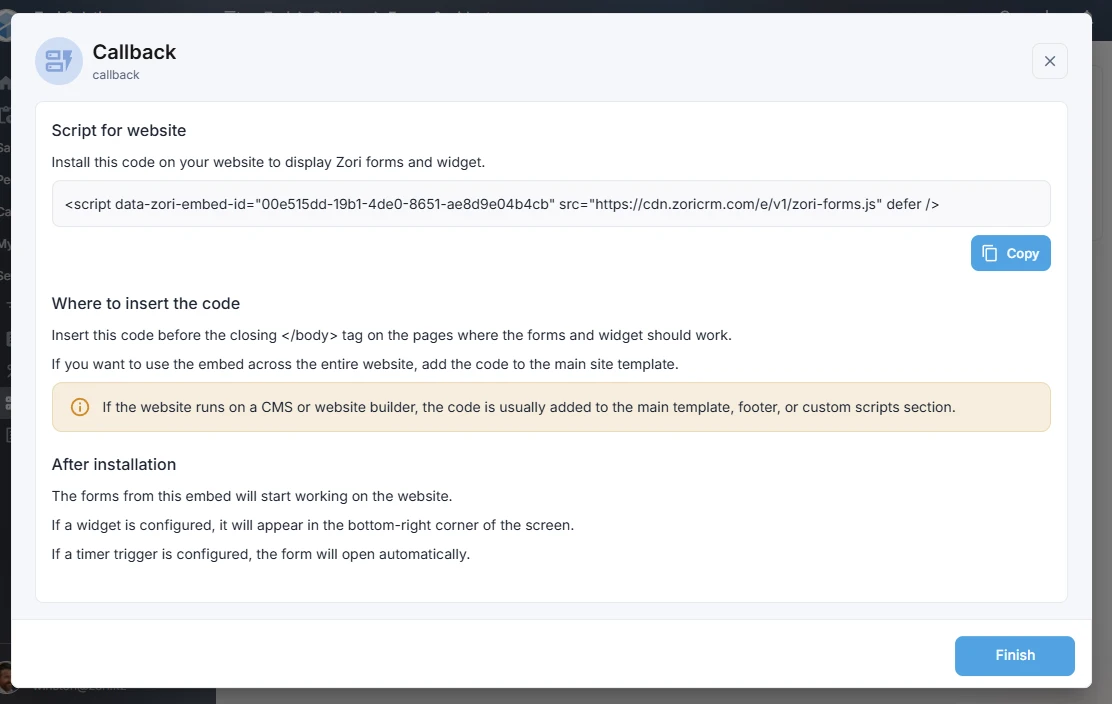
The main recommendation is to place this code before the closing tag on the pages where the forms and widget should work.
If you want to use the form or widget across the entire website, it is usually best to add the code to the shared website template.
Add the code to your website
Once you get the embed code, add it to your website HTML.
The two most common options are:
Option 1. Add the code to the shared website template
Use this if the form or widget should work across the whole website.
In this case, the code is usually inserted into the shared website template before the closing tag.
Option 2. Add the code only to specific pages
Use this if the form should work only on selected pages.
In that case, you can add the code only to those pages.
After adding the code, save your changes and open the website in a browser to check that the form and widget work as expected.
Open a form from your own button
In addition to the widget and timer-based display, you can open a form by clicking your own button or another HTML element on the website.
To do that:
- add the embed code to your website;
- attach the JavaScript form call, using the form code, to the element you want.
For example, you can open a form from a button in the hero section, a Contact Us button, a menu link, or any other page element.
Here is an example of a website button that opens a form when clicked:
<input type=“button” value=“Contact Us” onClick=“window._zorifrms.showForm(‘YOUR_FORM_CODE_HERE’)” />
The exact JavaScript call is shown in the form creation wizard on the publishing step.
What happens after installation
After the code is added to your website, the form can work in one or several modes depending on your settings:
- open through a widget;
- open when the visitor clicks your own element;
- open automatically by timer.
When a visitor submits the form, a lead is created in ZoriCRM.
If you are not ready to publish the form yet
You can create the form in advance and save it without publishing.
In that case, the form will appear in the Forms and Widgets section, but it will not be installed on your website until you create or configure an embed for it.
This is useful if you want to prepare the form first, review the texts or design, and publish it later.
What to check after installation
After adding the code to your website, make sure:
- the form or widget opens correctly;
- the website address is added to the allowed list;
- timer-based display works if it is enabled;
- opening from your own button works if it is configured;
- a lead is created after form submission.
If the form does not open or does not work as expected, go to the article Troubleshooting.